MoneyWorks Manual
Cells
To put text into the accumulator line when it is printed, we must put it into one of the cells of the report. A cell is the intersection of a part and a column. Cells can contain text or formulæ. Any value in a cell overwrites the information that would have otherwise been printed1.
- Double click on the cell that is in the intersection of the Show Accumulator part and the COL2 column
The Cell Settings dialog box will open.
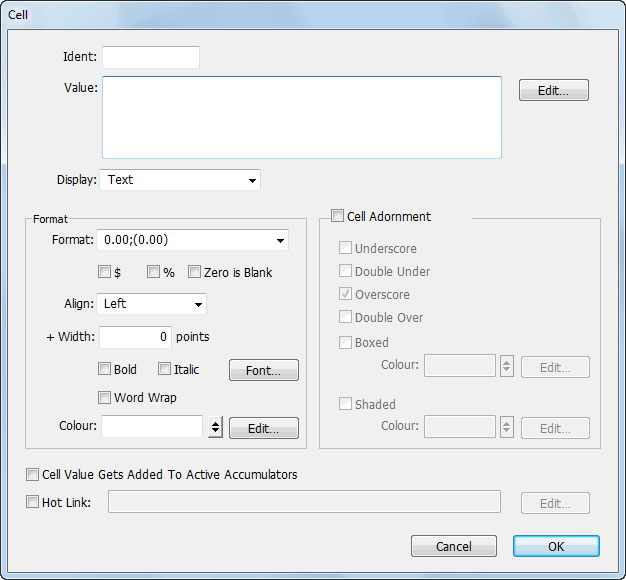
- Type “Gross Margin” into the Value field and set the Bold option
- Click OK to save the cell settings
Preview the report, and close the preview window when finished
We’ve got the basic part settings correct for the report now. We want to put in comparative results for the previous period, which means having an additional column.
We want each column to have the name of the period to which it refers. However this will vary depending upon for which periods it is printed, so we can’t just type in for example “June” as a column heading. Instead we use a report variable. This is calculated whenever the report is printed. The variable for the name of a period for a column is ColPer.
- Open the Actual (COL3) column by double-clicking its label
Putting the month as a column heading
- In the Heading, type “=ColPer” as shown below, and click OK

The equals sign is to indicate that an expression follows which MoneyWorks will evaluate when the report is printed (don’t type the quote marks though).
We now want to make another column for the previous period—apart from the period, this will be essentially the same as the column we have just worked on, so we’ll use copy and paste.
- Highlight the Column (COL3) by clicking once on the column heading, and Choose Edit>Copy or press Ctrl-C/⌘-C
The column information will be copied to the clipboard
- Click in the white area to the right of the report parts so that no portion of the report is highlighted
- Choose Edit>Paste or press Ctrl-V/⌘-V
A copy of the column is added to the right of the existing columns.
- Open up the Column Settings for the new column (COL4) by double clicking the column label
We want this column to refer to the previous period.
- Change the Value pop-up from Movement This Period to Movement Last Period and click OK
- Preview the report, closing it when finished
Adjusting Column Widths
- Move the mouse so that it lies on the boundary between the column label of the Account column and the next column
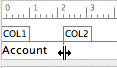
The cursor will change into a column adjustment tool.
- Hold the mouse button down and drag to the left
The column will narrow. Dragging right will increase it’s size.
1 Actually this is not quite true—if you have a “Null formula” (i.e. just =), the font attributes of the cell will be used instead of the Part style, leaving the underlying information unchanged. ↩